How to Craft Stunning DIY Wooden Wall Panels for a Timeless Home Look
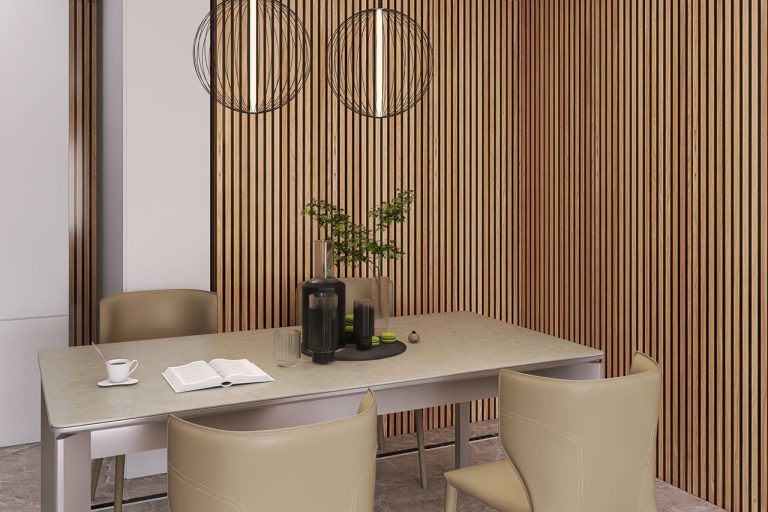
DIY wooden wall panels can add warmth and elegance to any environment. This simple but beautiful home improvement project may transform the look of any room. Whether you want to add rustic charm or a modern touch, wooden wall panels are a great option. With the correct supplies, tools, and a little patience, you can build a beautiful feature wall that will dazzle everyone who visits your home. If you’re looking to update your living room, consider adding
for a fresh, rustic look. Let’s explore the world of DIY wooden wall panels and learn how to easily enhance the look of your home.
Why DIY Wooden Wall Panels Are the Perfect Addition to Your Home
Wooden wall panels have the ability to completely change a room’s appearance and atmosphere. They incorporate natural textures, depth, and warmth, making your area feel welcoming and intimate. Here are some reasons why DIY wooden wall panels are an excellent choice.
- Customization: You can complement your home’s style with a range of wood varieties, procedures, and panel designs.
- Affordability: DIY efforts are more cost-effective than paying pros.
- Flexibility: Whether you want a minimalist or statement piece, wooden panels complement practically every design style.
- Value Boost: Wood panels can boost the overall value of your home while adding an attractive and timeless touch.
Materials You’ll Need for Your DIY Wooden Wall Panel Project
Before getting started, it’s important to gather all the necessary tools and materials for your DIY wooden wall panels. Here’s a detailed list of what you’ll need:
- Wood panels (Pine, cedar, or oak are excellent choices)
- Measuring tape to ensure precise measurements
- Level To guarantee that the panels are fitted straight.
- Circular saw or miter saw (If you have to cut the wood yourself.)
- Wood adhesive attaches the panels to the wall.
- Hammer and nails or nail gun For securing the panels
- Wood stain or paint (optional for a custom finish)
- Trim or molding for finishing edges
Choosing the Right Wood for Your DIY Wooden Wall Panels
The wood you select has a big impact on the ultimate look of your DIY wooden wall panels. Here are some options to consider:
- Light woods Pine trees produce a fresh and airy atmosphere.
- Dark woods Walnut, for example, creates an elegant and intimate ambiance.
- Exotic woods Mahogany adds a luxury touch with its rich tones.
Consider the overall vibe of the room and how the wood complements your existing furniture and design elements.
Take Accurate Measurements for Your DIY Wooden Wall Panels
Proper measurements are the foundation of any successful DIY wooden wall panels installation. Here’s how to get them right:
- Measure the wall’s height and width: To determine how many panels you’ll need, first measure your wall’s measurements.
- Account for obstacles: Be cautious of windows, doors, and electrical outlets, as these may alter how your panels are organized.
- Plan your design: Determine if you want to construct full-height panels or simply cover a portion of the wall for a more decorative effect.
Step-by-Step Guide to Installing Your DIY Wooden Wall Panels
Once you have your materials ready, it’s time to get to work! Follow these steps to easily install your DIY wooden wall panels:
Prepare the Wall Surface
- Clean your wall to remove any dust and debris. A clean surface improves the adhesive bond and ensures the panels remain in place.
Cut the Panels to Size
- Using a saw, trim the panels to the proper height and width. Make sure your cuts are neat and exact to avoid gaps between panels.
Apply the Wood Adhesive
- Apply a large amount of wood adhesive on the back of each panel or directly to the wall where you will be mounting the panels. The adhesive will hold the panels securely in place.
Position the Panels
- Begin from the bottom or one corner of the wall. Position the first panel, making sure it’s straight and level. Once the first panel is in place, proceed to install the remaining panels, working your way up the wall.
Secure the Panels
- To provide stability, fasten the panels to the wall using a hammer and nails or a nail gun. Make sure the nails are pushed into the studs for optimal strength.
Finishing Touches
- If you wish, apply a unique finish with paint or wood stain to give the panels a polished appearance. To get a clean, professional appearance, trim the panel edges with molding.
Tips for a Professional Look with DIY Wooden Wall Panels
- Pre-finish the Panels: If you want a faultless finish, stain or paint your panels prior to installation. This saves time and ensures an even coat.
- Use Spacers: During installation, use small spacers to keep the panels equally separated.
- Cut Panels to Fit Around Obstacles: If you have outlets or light switches, carefully measure and trim the panels to accommodate them.
Maintenance Tips for DIY Wooden Wall Panels
Once your DIY wooden wall panels are installed, it’s important to maintain them properly. Whether you’re starting small or going all-in,
can transform any room. Here’s how:
- Dust Regularly: Use a microfiber cloth to dust your wooden panels on a regular basis.
- Avoid Moisture: Keep your panels dry to avoid warping and damage. If you live in a humid climate, consider using a protective sealant.
- Touch Up Finish: Over time, the finish may fade or chip. To keep the panels looking good, touch them up with a matching stain or paint on a regular basis.
FAQs About DIY Wooden Wall Panels
1. Can I install DIY wooden wall panels in a bathroom?
Yes, but you should use moisture-resistant wood and a protective sealer to avoid water damage.
2. How do I ensure the panels stay level during installation?
Using a level tool will help ensure that the panels are properly aligned as you install them. It is critical to inspect each panel before fastening it to the wall.
3. What is the best wood type for DIY wooden wall panels in a living room?
For living rooms, pine and oak are excellent alternatives due to their adaptability and warm, neutral tones that complement most decorating styles.
4. How do I prevent gaps between the panels?
Make sure to measure and cut each panel precisely. If you want a grid-like pattern, use spacers to keep the spaces consistent.
Why Choose DIY Wooden Wall Panels?
Creating your own DIY wooden wall panels is an easy approach to improving your home’s interior style. With a few materials and careful planning, you can add warmth, texture, and refinement to any space. With
, you can create a unique, personalized atmosphere in your home. Whether you’re working on a single accent wall or a whole room, hardwood panels give a level of elegance that is difficult to match.